All About Food

Category: Recipe Category

All About Food Blog also writes occasional recipe for our readers.

  • Kaffir Lime Cake Recipe

    Kaffir Lime Cake Recipe

    One day, my son went to have a playdate with his friends. We had a long talk with the grandmother about our extensive use of kaffir lime in our cuisine. She then shared this amazing recipe to make kaffir lime cake. This is now our go to recipe for amazingly easy cake that everyone loves!

    What do we need to make Kaffir Lime Cake?

    1. 1.5 cups of Self Raising Flour
    2. 2/3 cup of oil (any light oil will do)
    3. 3/4 cup of thickened cream
    4. 1 cup of sugar
    5. 2 Eggs
    6. Zest of 2 kaffir limes

    Most of the ingredients above can be found quite easily in your local supermarket. Kaffir lime is potentially harder to find. In this case, you can pretty much replace it with any type of citrus!

    Kaffir Lime Cake Recipe

    How do we make Kaffir Lime Cake Recipe?

    1. Preheat oven (between 170 – 180 degrees) – We usually do it at 180.
    2. Grate zest from 2 limes.
    3. Add sugar and mix through well – oil from zest will soak into sugar.
    4. Put in oil, cream and eggs – then whisk.
    5. Add flour. Mix through just until you see no lumps. DO NOT OVERMIX! – All it will do is make your cake heavy!
    6. Pour into tin – lined with baking paper. 23-cm tin generally works well for this much mixture.
    7. Cook for about 35 minutes.
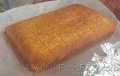
    8. Dust with icing sugar.

    A little tips to make your perfect Kaffir Lime Cake

    1. I can’t stress enough the importance of not overmixing the dough. You want your cake to still be light and airy!
    2. We usually add poppy seed into the mixture to add.
    3. If you want to be really naughty, you can also put in more toppings above the cake. Why don’t you try whipped cream? or a fruit mix!

    If you like this recipe, why don’t you visit our recipe page! My personal favourite is the party food: Tetsuya’s Oyster Vinaigrette recipe.

    Kaffir Lime Cake Recipe
  • Indonesian-style Butter Chicken Recipe

    Indonesian-style Butter Chicken Recipe

    For this recipe, we loosely translated the Indonesian-style butter chicken recipe from an Indonesian website, selerasa, because one of my friends are dreaming about it since he tasted one in Bali. Unlike all of our other recipes, this one I did not manage to create.

    Indonesian-style Butter Chicken

    What do we need to make Indonesian-style Butter Chicken?

    1. One whole chicken
    2. One lime, squeezed
    3. Salt

    For its marinade and sauce:

    1. 1 tbsp of Worcestershire sauce
    2. 4 cloves of garlic, coarsely ground
    3. 3 tbsp of margarine
    4. 1 segment of ginger, coarsely ground
    5. 2 tbsp of sweet soy sauce (kecap manis)
    6. 3 limes, squeezed
    7. 1 onion, diced
    8. Cooking Oil
    9. Salt and Pepper

    The preparation for making
    Indonesian-style Butter Chicken

    1. The most obvious thing is to prepare for the chicken. If you buy a whole chicken, you will need to clean it up and chop it into 16 sections or more, depending on your preference.
    2. After cleaned and chopped, put the chicken into a bowl and slather in lime juice and salt. Put aside for around 10 minutes.

    How do we make the
    Indonesian-style Butter Chicken?

    1. After 10 minutes, put in the Worcestershire sauce with the salt and pepper. Mix them up until the chicken pieces are covered evenly. Put aside for at least another 10 minutes to let the marinade seep in.
    2. Heat up cooking oil on a pan and stir fry the garlic until it smells fragrance.
    3. Put the onion and ginger. Stir fry them further until the fragrance smell of onion pops out.
    4. Put the chicken into the pan and stir it until the chicken is dry and change colour into golden brown.
    5. Once it changes colour, put in the margarine and mix until the margarine melted.
    6. Lastly, pour the sweet soy sauce over and wait until the chicken is dry and cooked evenly.
    Indonesian-style Butter Chicken Recipe

    A little tips to make your perfect Indonesian-style Butter Chicken

    1. Indonesian-style butter chicken is meant to be super sticky and dry. If you want it a bit more moist, you might want to shorten the time needed to cook it in sweet soy sauce and margarine.
  • Grilled Beef Tongue Recipe

    Grilled Beef Tongue Recipe

    This week we will be writing about an Indonesian recipe with a little twist, Japanese-style. The recipe is for Grilled Beef Tongue with miso butter sauce.

    To be perfectly honest, we weren’t planning to make the Japanese version of it. However, we ran out of the Indonesian ingredients and had to make a little adjustment. Eventually, it worked out brilliantly!

    Grilled beef tongue is one of my favourite Indonesian dishes. It takes quite a long time to prepare and very quick to devour.

    Grilled Beef Tongue Recipe

    What do we need to make Grilled Beef Tongue?

    1. Whole Beef Tongue – it can be pretty intimidating
    2. Onions
    3. Garlic
    4. Miso paste – you can get any packaged miso paste from grocery shop
    5. Butter – same proportion to the miso paste

    I did not put a specific number because you may add or reduce according to your need.

    The preparation for making Grilled Beef Tongue

    The hardest part in the making of this is waiting. You will need to boil the whole beef tongue with onions and garlic in a stockpot/saucepan for more than 3 hours.

    After 3 hours of boiling, remove the beef tongue from the stockpot. You will need to peel off the outer layer of the tongue. If you boil the tongue long enough, you will be able to peel it off easily. Otherwise, add an extra hour in the stockpot.

    How do we make the Grilled Beef Tongue?

    1. After peeling off its outer layer, slice the tongue around 0.5 – 1 cm thick.
    2. Melt the butter. 20 seconds in the microwave should be enough.
    3. Mix the miso paste with melted butter.
    4. Brush the miso butter sauce onto the beef tongue.
    5. Grill the beef tongue on both sides.

    A little tips to make your perfect Grilled Beef Tongue

    1. Like I mentioned earlier, you need to boil the beef tongue long enough so that you can easily peel off the outer layer.
    2. Serve the beef tongue over rice!
    3. For the Indonesian recipe, we usually use the ‘satay padang‘ paste from Munik. You can also substitute the sauce with your favourite basting sauce.

  • Super Simple American Smoky Beef Brisket with BBQ Sauce

    Super Simple American Smoky Beef Brisket with BBQ Sauce

    Recently, there is a surge of burger joints in Sydney that serve American-style burger that looks pretty messy and possibly disregard any health concern. I tried a couple of them, especially the smoky beef brisket, and was instantly loving it. Coupled that with a tv show called “Man Fire Food” and here I am searching a way to make smoky beef brisket!

    I read a recipe from Taste.com.au on how to make smoky beef brisket and tweaked it a bit. This way, I don’t need to purchase additional ingredients that I might not need in the near future.

    Smoky Beef Brisket

    What do we need to make Smoky Beef Brisket?

    This is the original recipe:
    1. 1/2 cup smoky bbq sauce
    2. 1/4 cup bourbon
    3. 3 garlic cloves, crushed
    4. 2 teaspoons smoked paprika
    5. 1/4 – 1/2 teaspoon cayenne pepper
    6. 1.3kg beef brisket

    I substituted the sauce and bourbon to 3/4 cup of McCormick Grill Mates Brown Sugar Bourbon BBQ sauce (because this is the one I currently have at home). I also use Mexican chili instead of cayenne pepper.

    The preparation for making Smoky Beef Brisket

    Combine all of the ingredients above in a baking dish (quite a big one). Make sure you coat every part of the beef brisket (turn several times if needed). Once the beef brisket is fully immersed in the marinade, cover the dish with cling wrap. Leave it in the fridge overnight (or a minimum of four hours in the fridge).

    You might also want to buy burger buns and coleslaw for the salad.

    Smoky Beef Brisket


    How do we make the Smoky Beef Brisket using conventional oven?

    1. Preheat oven to 160 °C or 140 °C fan-forced.
    2. Cover the baking dish with aluminium foil.
    3. Bake for 2.5 hours.
    4. Turn the beef upside down. Be careful when taking the dish out as it is very hot.
    5. Bake for another 2 hours or until you can easily scoop the beef with fork.

    Smoky Beef Brisket
    Half way

    Smoky Beef Brisket

    A little tips to make your perfect Smoky Beef Brisket

    1. For the cup measurement, I use the standard kitchen cup (possibly something around 237 ml).
    2. Be generous with the marinade sauce. Be VERY generous!
    3. Add extra chili for extra kick!

    Smoky Beef Brisket

  • Japanese ChaShu Recipe

    Japanese ChaShu Recipe

    Traditionally speaking, Japanese uses pork belly that are rolled into a log to create the perfect Chashu. We are now trying to make Japanese Chashu beef! You can also make chashu chicken using this recipe, but make sure you use its thigh.

    I will also write how to cook Chashu beef using conventional oven (this is the recipe I got) and using Slow Cooker (my ‘cheat’ mode).

    Japanese-style Chashu Beef Recipe

    What do we need to make Chashu Beef?

    1. 2 Kg Beef Chuck Steak or you can also use beef brisket
    2. 1/2 cup soy sauce
    3. 1 cup cooking sake
    4. 1 cup mirin
    5. 1/2 cup sugar
    6. 6 Spring onions, roughly chopped
    7. 1 1/2 tbsp of garlic (or 6 whole garlic cloves)
    8. 1 1/2 tbsp of ginger (or 5 cm knob ginger, roughly sliced)
    9. 1 whole shallot (or you can substitute it with half Spanish onion)

    Ingredients for making Japanese Chashu Beef  Additional ingredients for making Japanese Chashu Beef

    The preparation for making Chashu Beef

    Nothing! Just get all of the ingredients and follow the steps below.

    Mixture for making Japanese Chashu Beef
    Mixture for making Japanese Chashu Beef


    How do we make the Chashu Beef using conventional oven?

    1. Preheat oven to 135 °C.
    2. Heat 1 cup water, soy sauce, cooking sake, mirin, sugar, spring onions, garlic, ginger, and shallot in a medium saucepan over high heat until boiling.
    3.  Add beef chuck steak. Cover with a lid left slightly ajar. Transfer to oven and cook, turning beef occasionally, until beef is fully tender and a cake tester or thin knife inserted into its center meets little resistance, 3 to 4 hours. Transfer contents to a sealed container and refrigerate until completely cool.
    4. When ready to serve, remove beef and strain broth. Reserve broth for another use (like making ajitsuke tamago). Slice beef into thin slices (it might help to cut it in half lengthwise first).
    5. Reheat beef slices in soup broth with noodles and other garnishes. Alternatively, heat a small amount of reserved broth in a skillet and heat beef slices in broth until hot or reheat with a blowtorch, charring its surface. Serve.

    Refrigerated Japanese-Style Chashu Beef
    Refrigerated Japanese-Style Chashu Beef

    How do we make the Chashu Beef using slow cooker? – My Personal Take

    1. Add all of the ingredients above into the slow cooker.
    2. Set the slow cooker to cook on ‘high’ for two hours.
    3. Set the slow cooker to cook on ‘low’ for three hours.
    4. Put chashu beef into a sealed container and refrigerate until completely cooled.
    5. When you are about to serve it, carve up your desired amount, put some of the broth in and reheat the chashu beef in microwave.

    Slow Cooker for making Japanese Chashu Beef

    A little tips to make your perfect Chashu Beef

    1. For the cup measurement, I use the standard kitchen cup (possibly something around 237 ml).
    2. You can mix the beef and all of the ingredients a day in advance to marinade it.
    3. The chashu beef is obviously best served with Ramen. However, we like to eat them just with a warm jasmine rice.

    What is the difference between Chashu and Char Siu?

    According to Wikipedia, Japanese Chashu is prepared by rolling the meat into a log and then braising it at a low temperature. It is also cooked without using the red food colouring and five-spice powder.

    Japanese-style Chashu Beef Recipe

  • Baked Potatoes with Parmesan and Cheddar

    Baked Potatoes with Parmesan and Cheddar

    One day, a friend of mine shared several images on his facebook page. One of the images shared captured my attention and suddenly I had the urge to try making them!  It is baked potatoes with parmesan and cheddar.

    Before long, I bought all of the ingredients (the ones I haven’t got in the fridge/pantry) needed to make the baked potatoes and we are ready to go!

    There were quite a bit of items to prepare, but the cooking itself was quite fast and painless.


    What do we need to make Baked Potatoes with Parmesan and Cheddar?

    1. Australian Brushed Potatoes
    2. Parmesan Cheese – the one that came as a block of cheese
    3. Cheddar Cheese – also the one that came as a block of cheese. In the picture, you will see different cheddar, but you can use the normal cheddar cheese.
    4. Sour Cream
    5. Spring Onion
    6. Salt and Pepper

    All of the ingredients above can be found quite easily in your local supermarket. I did not put any measurements in the list of ingredients as you could freely use as much or as little of them as you want!

    Ingredients for Baked Potatoes with Parmesan and Cheddar


    The Preparation for Baked Potatoes with Parmesan and Cheddar

    1. When you bought the same potatoes as mine, you would want to clean them up off any soils on their skin.
    2. Put them in a cooking pot, but make sure they are immersed in water and add some salt as needed.
    3. Boil them in high heat. I add six minutes AFTER the water boiled in the pot before taking the potatoes out.
    4. Chop Onion Spring, as needed
    5. Sliced parmesan cheese thinly. In the picture I did not cut it thin enough and it didn’t look nice when slipped into the potatoes.
    6. Cut the potato into several sections (the more the better), but not deep enough so that you keep the whole figure intact.
    7. Slipped the parmesan slices into each compartment (i.e. the sliced part) of the potato.
    8. Grate the cheddar cheese on top of the potato. 

    Boil the potatoes Garnish and Cheese Preparation


    How do we make Baked Potatoes with Parmesan and Cheddar?

    1. Pre-heat oven to 200o The term pre-heat means you leave it on for around 5 minutes in that temperature before you put in your potato.
    2. Put the potato on the baking tray. Make sure you cover the baking tray with aluminium foil.
    3. Put the baking tray into the oven for around 15 minutes.
    4. After taking it out of the oven, add a blob of sour cream and garnish with spring onion.

    Baked Potatoes with Parmesan and Cheddar

    Baked Potatoes with Parmesan and Cheddar


    A little tips to make your perfect Baked Potatoes with Parmesan and Cheddar

    1. You don’t need to peel the skin off the potatoes.
    2. Boil it a little bit longer if you want to make a softer potato.
    3. Don’t grate the cheddar cheese beforehand. They are quite sticky! 


    Final presentation for Baked Potatoes with Parmesan and Cheddar 

    Baked Potatoes with Parmesan and Cheddar